Pineapple pachadi

A delectable and tropical dish at its savoury finest, pineapple pachadi is a South Indian side dish (quite popular in Kerala), which is made of cooked and tempered fresh pineapple and yoghurt. Sweet and tangy in taste, this recipe is absolutely fail-proof and a crowd pleaser.

What makes this dish really stand out is the way all the ingredients work so well with each other, creating a flavourful punch with every spoonful.

If you are still dubious about pineapple not being in a dessert format, here are the plus points that will (hopefully) convince you into making this dish:

  1. Unique: How many times would you hear a tropical fruit being made savoury? So cool!
  2. Easy peasy: This dish takes 15 minutes tops. You can actually make it while streaming videos on YouTube (I know I did!)
  3. Healthy: Fresh fruits are any day overly nutritious and this dish guarantees a close to nil grease. Fitness watch: Check
  4. Addictively delicious: Isn’t it always amazing when healthy food is finger licking’ good?

So the next time you buy pineapples to bake an upside down cake or blend a pina colada, do save some pineapple pieces to try your hand at this outstanding dish – you will love it!

IMG_9480.JPG

Ingredients:

  • Fresh honey pineapple: 1 cup, cored and chopped into small pieces
  • Fresh coconut: 1/4 cup
  • Cumin seeds: 1 tsp
  • Black mustard seeds: 2 tsp
  • Turmeric powder: 1/4 tsp
  • Red chilli powder: 1 tsp
  • Dried red chilli – 1
  • Curry leaves: 1 sprig
  • Oil: 1 tbsp
  • Sugar: 1 tbsp
  • Salt: To taste
  • Fresh yoghurt: 1/4 cup, beaten till smooth

Method:

  • Blitz: Coconut, cumin seeds and 1 tsp black mustard seeds to a fine mixture
  • In a pan, add pineapple, turmeric powder, chilli powder, sugar and salt
  • Mix well and add 3-4 tbsp water. Let the pineapple cook and become tender, stirring frequently
  • Once pineapple gets cooked, add the coconut mixture and cook till the pungent/raw smell dissipates
  • Once the water evaporates and the mixture becomes semi-dry, switch off flame and add in the yoghurt. Mix well and pour into a serving bowl
  • In a separate small pan, heat 1 tbsp oil and add remaining mustard seeds, dry red chilli and curry leaves
  • Once the temper starts to splutter, switch off flame and pour it onto the pineapple mixture
  • Serve immediately (preferably with hot rice but also as a dip)
  • Enjoy!

Stir-fried potatoes with citrus and cilantro

Sometimes all you want to have after coming home is delicious food which is really quick to whip up. After all, who wants to slog in the kitchen for hours after a stressful day at work?

These citrusy potatoes are the perfect answer. All you need is some leftover boiled potatoes, a wedge of lime and fresh cilantro to create a deliciously comforting yet super easy dish. I love having these potatoes with warm rice and ghee (clarified butter). However, they taste just as good with roti’s (Indian flatbread) and bread. More often than not, I have it on its own as well, when impatience gets to the better of me. And that’s completely okay, because it’s a dish that goes well with pretty much anything 🙂

IMG_6964.png

Ingredients:

  • Potatoes: 2 medium, boiled, cut into small chunks or grated
  • Oil: 4-5 tbsp
  • Fresh lime juice: From 1/2 lime (you can also use lemon)
  • Turmeric powder: 1 tsp
  • Mustard seeds (optional): 1 tsp
  • Asafoetida: 1 tsp
  • Fresh cilantro: 3-4 tbsp, finely chopped
  • Salt: To taste

Method:

  • Heat oil and add mustard seeds, turmeric and asafoetida
  • Give a quick stir and once the mustard seeds start to splutter, add potatoes
  • Stir-fry potatoes till they slightly brown and add chopped cilantro
  • Note: Potatoes absorb oil very quickly, add a little more oil if the mixture becomes too dry
  • Mix well, add salt to taste
  • Switch off the flame, add the lime juice and give a good mix
  • Serve piping hot!

Note: If you want the potatoes to be spicy, add a slit green chilli or red chilli powder when adding turmeric


Thai red curry

Thai curries make for one the most soulful and comforting meals, especially during a lazy, drizzly day. The broths are so complex and flavourful, your taste buds make you go back for more and more (and then some more).

My love for Thai food is to the extent that I takeout from Thai restaurants at least 4 times a week (there was a time when I had Thai green curry for lunch every day for a month – no kidding!).

Having said that, eventually I decided it was time to learn the nuances of Thai cuisine myself and stir-up the magic in the kitchen.

Two months back, I finally bought a big fat cookbook holding recipes from well-known chefs and street hawkers all over Thailand – obviously the book boasted of authentic Thai stuff, but come to think of it, nothing can get as real as street food can it?

After satiating myself by flipping through all the pretty pictures an infinite number of times, I eventually decided to try red curry as my very first attempt into Thai cooking.

It is a dish which is not overtly spicy, pleasantly oily, rich and mild. In short, a perfect meal for dinner after a hard days work. The original recipe called for prawns and pineapple, so I substituted the prawns with a mix of veggies (carrots, baby corn, broccoli).

After sweating it out in the kitchen for an hour, the end result came out so well that I could hardly believe it myself.

The magic is the balanced medley of spiciness from the red curry paste and tart sweetness from the pineapple – right proportions of both when combined with luscious coconut cream is what creates a winning dish with flavours that linger on your taste buds (salty, sweet and sour) much after you have had the sinful bite of steamed rice with the curry.

No less that what you get in fancy restaurants, this recipe is a keeper.

CA95C126-A811-46E1-82A1-6747E9B3063D.JPG

[Adapted from: Khao restaurant, Bangkok]

Ingredients:

  • Coconut cream: 500ml
  • Coconut milk: 250ml
  • Hot water: 120ml
  • Red curry paste: 3 tbsp
  • Soy sauce: 1.5 tbsp (add more at a later stage if needed – soy sauce is very salty so its best to add it with precaution)
  • Palm sugar: 2 tbsp
  • Tamarind sauce: 220g
  • Pineapple: 200g, tinned, cubed
  • Firm tofu: 100g, cubed
  • Carrots: 2 medium, sliced into discs, parboiled
  • Broccoli: 1/4 cup, small florets, parboiled
  • Baby corn: 5-6, slit, parboiled
  • Kaffir lime leaf: 1, chopped finely
  • Red thai chilli: 1, finely sliced

Method:

  • Bring coconut cream and water to a rolling boil under medium flame in a large pan, until a thin layer of oil begins to surface
  • Add red curry paste and stir well till fragrant, and oil emerges again
  • Add coconut milk, soy sauce, sugar and tamarind
  • Mix well and bring broth to a simmer
  • Add vegetables, tofu and pineapple and continue simmering for another 7-10 minutes
  • Taste and adjust seasonings as needed
  • Switch off flame, add kaffir lime and chilli and stir to combine
  • Serve hot with steamed rice


Shorshe begun – Aubergines in mustard sauce

Out of all the diverse cuisines available on a platter in India, Bengali cuisine features in my list of top 3 favourites. The spices they use, and the resultant dishes produced are unlike other Indian dishes, and quite frankly, no less than wow-za.

There is a really good Bengali restaurant here in Singapore, called Mustard. My dear Bong friend and I hop over there for lunches whenever we have those sudden bursts of cravings. Dishes we order are usually standard; we absolutely HAVE to have the koraishutir kochuri (puffed bread stuffed with mashed peas filling, flavoured with fennel seeds and ginger), begun bhaja (shallow fried marinated slices of aubergines), dhokar dalna (lentil cakes soaked in a Bengali style curry) with steamed rice, luchi (deep friend puffed bread) and mishti doi (sweet yoghurt). And we make it a point to order one dish that we haven’t tried from the menu before.

Last year, during Navratri, the restaurant had a few items specially being made during the festival. One of it was shorshe begun, which is aubergines cooked in a pungent mustard and yoghurt-base gravy.

I’m not really a ‘mustard’ fan (ironic, given that I have a liking for Bengali food), but this particular dish blew my mind off.

The aubergines melted in my mouth as soon as I bit into it. And the pungency of the mustard was ever so balanced by the creamy yogurt. It actually ranked equal to my dhokar dalna, which is my favourite most dish in the restaurant.

So last week I went to Mustard again, after a long time, just to have shorshe begun. But alas, to my dismay, I was told that the item was not a regular on their menu.

No amount of luchis or dokar dalna I ate in compensation made up for that pang I was having for those god-gifted mustardy aubergines.

Which is what led me to trying out the dish myself. The original recipe calls for a good amount of poppy seeds (another prominent ingredient in Bengali cuisine). Unfortunately, it is not easily available here in Singapore, so I compensated with coconut instead. And hey, the resultant dish was uh-may-zing !

No kidding. Go buy aubergines from the nearest supermarket and try it out !

IMG_4256.JPG

[Recipe adapted from: Bong Mom’s cookbook]

Ingredients:

  • Mustard seeds: 4 tbsp (soaked in 1/4 cup water)
  • Fresh coconut: 2 tbsp
  • Green chilli: 2
  • Cilantro: 2 cups
  • Yoghurt: 4-5 tsp
  • Water: 2-3 tbsp
  • Aubergine: 1 medium sized
  • Turmeric powder: 2 tbsp
  • Salt: to taste
  • Oil: Preferably mustard oil, else any vegetable oil

Method:

  • Blitz all ingredients except aubergine, turmeric, salt and oil into a smooth paste
  • Keep aside
  • Slice aubergines into longitudinal slices
  • Smear both sides of each aubergine slice with a good sprinkling of turmeric and salt
  • Keep aside for 5-7 minutes
  • Heat oil in a pan and fry the aubergine slices till both sides are evenly brown and cooked
  • Place the cooked slices on absorbing paper to remove excess oil:

FullSizeRender 2.jpg

  • Return pan to flame and add more oil (if needed), to cook the gravy
  • Add the mustard paste and adequate water to make it a semi-thickened gravy
  • Allow it boil and subsequently lower the flame for the gravy to simmer
  • Cook till the gravy thickens and the mustard aroma becomes prominent
  • Add little salt (don’t add too much since the aubergines are salted already)
  • Add red chilli powder for an extra spicy kick, if desired
  • Add the aubergine slices gently and toss carefully to ensure it is well coated
  • Cook for another 3-4 minutes and switch off flame
  • Cover the pan for at least 30 minutes to let the flavours blend well
  • Serve hot with plain rice and ghee


Kaffir lime kadhi

Kadhi is an Indian dish that comprises of thick chickpea flour-yoghurt based gravy with vegetable fritters soaked into it. Tangy in taste due to the yoghurt, it is usually consumed with steamed rice of Indian flatbreads.

Kadhi is very versatile, in the sense different regions in India have their own unique recipe. For example, the kadhi made in Punjab is different to what is made in Gujarat. Having said that, they all taste delicious.

This recipe pays ode to what is commonly prepared in Indian households, taking a traditional, homely dish and rendering it with a flavourful twist.

IMG_3128

Ingredients:

Kadhi:

  • Tangy yoghurt: 3/4 cup, whisked
  • Water: 1.5 cups
  • Chickpea flour: 3 tbsp
  • Turmeric powder: 1/4 tsp
  • Red chilli powder: 1/4 tsp / to taste
  • Garam masala: 1/4 tsp
  • Asafoetida: Generous pinch
  • Salt: To taste

Tempering:

  • Onion: 1 small, diced
  • Ginger: 1/2 tbsp
  • Garlic: 1 clove, crushed
  • Fenugreek seeds: Approximately 10
  • Dry red chillies: 2, broken
  • Cumin seeds: 1/2 tsp
  • Kaffir lime leaves: 5, halved
  • Oil: 1 tbsp

Additional:

Method:

  1. Add all ingredients under the ‘kadhi’ section except water
  2. Whisk well until no lumps remain
  3. Add water and whisk again, ensuring a uniform and smooth batter
  4. Heat oil and add: fenugreek seeds, cumin seeds, ginger and garlic
  5. Allow them to roast under medium-low flame till they aromatise
  6. Add onions and sauté till they are tender and translucent
  7. Add kaffir lime leaves and red chilli, and sauté for another minute or two
  8. Add the kadhi mixture and mix well
  9. Increase the flame and cook the kadhi, bringing it to a boiling point
  10. Since the base is chickpea flour, the kadhi can thicken very quickly, hence keep an eye as it is boiling
  11. Once the kadhi starts to boil, lower the flame and simmer the kadhi for 5-6 minutes
  12. Taste dish and adjust spices as needed
  13. Add kothimbir vadi and mix gently, so that they are well coated with the kadhi
  14. Switch off flame and cover the pan, so that the vadi’s absorb the gravy and become moist & juicy. The long it is soaked, the tastier it gets. I soaked mine for an hour
  15. Serve kaffir lime kadhi fresh with rice or roti’s

Pav bhaji fondue

Happy belated new year to all fellow bloggers!

It feels like decades ago since I last visited my blog. With homecoming, family reunions, all to soon tear-jerky farewells and then readjusting back to routine, it was pretty much impossible to even think of extracurriculars, which in my case, is my beloved blog.

However, I am back and I am excited for the various recipes I have planned for the year!

So, this particular recipe is close to my heart, because it reminds me of home. Pav bhaji is a very popular street food / fast-food dish from Maharashtra (a state in India), which consists of a vegetable curry (bhaji) and soft, buttery bread rolls (pav).

The vegetable curry is spicy and mashed, and served with chopped onions, cilantro, lime wedges and a dollop of butter (the more the better). I have this dish gazillion time every time I am home; be it homemade, or roadside, or cozy cafes. It is so damn good!

For Christmas last year, we went to this place called SpiceKlub, in Mumbai. It is relatively new and known for its unique way of presenting food. Definitely worth visiting, if you happen to be in Mumbai (bear in mind though that you need to book at least 1-2 weeks in advance; they fill up very very quickly). If you are not in Mumbai, you can always instagram them or check their site; the menu is worth a glance.

So anyway, one of the dishes we had was pav bhaji fondue! The spicy vegetable mash was creamy and cheesy, was served in an airy, puree form. I think it was the aeration that gave it a fluffiness that melted in the mouth. Such a simple concept, yet so novel.

No points for guessing, one of the first dishes I tried to make once back in Singapore was an attempt to recreate pav bhaji fondue.

Here goes my first recipe of 2016.

Try it. Seriously. It is finger licking good stuff.

IMG_3043.JPG

[Inspired from: SpiceKlub, Mumbai]

Ingredients:

  • Garlic: 1 large clove, crushed
  • Red onion: 1 small, diced
  • Green bell pepper: 1 medium, diced
  • Tomatoes: 1 large, diced
  • Oil: 1 tbsp
  • Pav bhaji masala: 2 tbsp
  • Milk: 1/8 cup
  • Cheddar/Mozarella cheese (optional): a generous sprinkle
  • Salt: to taste
  • Cilantro: 1/4 cup, finely chopped
  • Lime: 1/4 wedge (for garnishing)
  • Bread (of your choice): Toasted, cut into cubes

Method:

  • Heat oil and add garlic. Sauté till aromatic
  • Add onions and cook under low flame till onions become translucent
  • Add bell peppers and continue sautéing till they become tender
  • Next, add tomatoes, and mix all the vegetables under medium-low flame
  • Add salt and pav bhaji masala at this point
  • Continue cooking for atleast 10-15 minutes; the longer it cooks, the more flavour gets imparted
  • Taste the gravy and adjust as required
  • Switch off flame and cool the curry
  • Once cooled, blitz it to a smooth puree
  • Transfer the puree into your fondue pot or a serving bowl
  • Add milk into the blender jar and swirl, to allow it to mix with the leftover gravy
  • Add this to the main puree, along with cheese
  • Mix well, for the cheese to adequately melt (reheat again, if needed)
  • Before serving, garnish it with fresh cilantro, lime wedges and diced onions (optional)
  • Serve hot with warm toasted bread pieces
  • Enjoy !

Note:

  • Be careful when you blitz the bhaji: It needs to be lukewarm, yet not too hot, else you may end up having gravy coated kitchen walls
  • Adding cheese is optional: If you are diet conscious, omit it. The dish tastes just as fabulous without the cheese
  • To make the fondue richer, consider cooking the puree in butter and/or serving the fondue with a dollop of butter on top
  • The recipe does not call for chilli powder because the masala is quite spicy. However, you can add it in if you want an extra spicy kick


Vegetable butter masala

I woke up wanting to have a proper Indian meal today. With plenty of vegetables stocked up, my stomach grumbled that it wanted a mixed vegetable dish.

Wanting to give a restaurant taste, I added in butter to my gravy, which gave it the much desired richness (adding cheat ingredients are allowed on Sundays, right!).

Usually, I add cauliflowers and potatoes to my mixed vegetable dish, but this time I tried a different mix: sweet potatoes, peppers, corn and peas. It was a veggielicious combination!!

What’s more, after enjoying this dish with cumin-spiced rice and roti’s, I am happy to say that I have eaten my daily portion of veggies and thoroughly enjoyed it! 🙂

thumb_IMG_1886_1024

Ingredients:

  • Onion: 1 small, sliced
  • Garlic cloves: 2, crushed
  • Tomatoes: 2 small, quartered
  • Sweet potato: 1 small, peeled, cubed
  • Peas: 1/4 cup, boiled
  • Sweet corn: 1/4 cup, boiled
  • Piquillo peppers: 4 red and/or yellow, deseeded and julienned (alternative: 1/2 small red and yellow bell peppers each)
  • Cottage cheese: 1/4 cup, cubed
  • Coriander powder: 2 tsp
  • Turmeric powder: 1/4 tsp
  • Red chilli powder: to taste
  • Garam masala: 2 tsp
  • Dried fenugreek leaves: 1/4 cup
  • Fresh cilantro: 1/4 cup, finely chopped
  • Milk: 1/4 cup
  • Salted butter: 4 tbsp (or as per preference)
  • Sugar: a pinch (optional)
  • Salt: to taste
  • Oil: 4 tbsp

Method:

  • Dry roast sliced onions and garlic under medium-low flame till they start to caramelise, and set aside to cool
  • Once cooled, blitz onions and garlic with chopped tomatoes to a puree. Keep aside
  • Heat oil in pan and shallow fry sweet potatoes till tender. Remove and keep it on an absorbing paper to drain excess oil
  • Repeat process with cottage cheese and subsequently with piquillo peppers
  • In the same oil, add tomato-onion-garlic puree and 1/4 cup water
  • Mix and allow to simmer for 7-10 minutes, till you get a pleasant aroma
  • Add coriander, turmeric and chilli powders and garam masala
  • Stir and let it continue to simmer under low flame
  • Add salt, sugar, 2 tbsp butter and half the amount of fenugreek leaves
  • Cook for a minute for the spices to infuse
  • Add milk and gently (but continuously) stir, for homogenization
  • Add in all the vegetables and cottage cheese and stir well
  • Add in the remaining fenugreek leaves and butter and cilantro
  • Mix and adjust spices, as required
  • Let it simmer for another 3-4 minutes under low flame
  • Serve hot with roti’s or rice

Note:

  • You can omit the sugar if you wish to, since the sweet potato will impart sweetness to the dish


Gulab jamun kofta with spinach and roasted piquillo pepper purée

Gulab jamun immediately brings to mind succulent, melt-in-the-mouth, fried milky fritters exploding with rose-tainted sugar syrup.

An incredibly popular dessert in the Indian subcontinent, it is frequently made during festive or celebratory seasons.

Homemade gulab (rose) jamun (dumpling/kofta) is usually made up of powdered milk  and clarified butter (ghee); kneaded to form a dough, moulded into balls, deep fried and dropped into simmering sugar and rose water syrup.

I have a penchant for Indian sweets, and well-made moist gulab jamuns are one of my absolute favourites.

My mum had given me two small packets of ready-to-mix gulab jamuns the last time she was in town.

While I really wanted to experiment and give a twist to the well-known sweet, at the same time I also wanted to enjoy the original version.

So the first packet went in making the original version, with no experimentation whatsoever.

After satisfying my (incredibly Indian) sweet tooth, I set out to experiment with the second batch, which is what this post is all about.

I wanted to make a savoury dish out of the jamuns – my rationale was, when jamuns are fried, they are essentially kofta – so be it dipped in sugar syrup or a gravy, I assumed it would work either way.

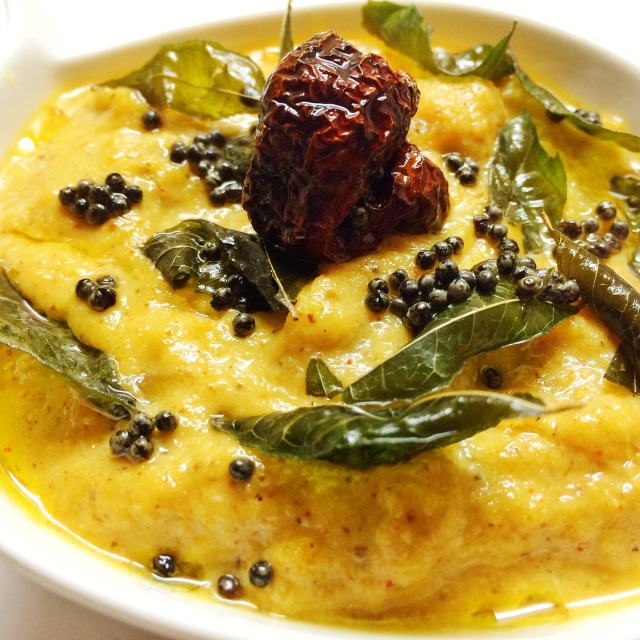
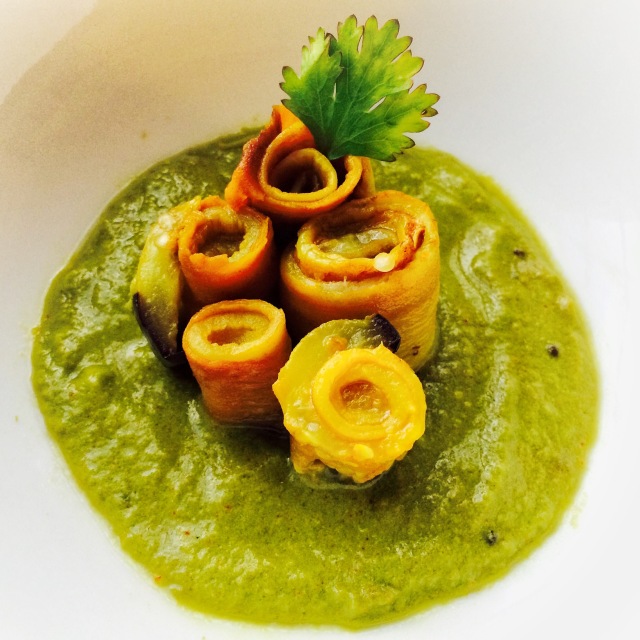
Bored of making the traditional tomato gravy for my koftas, this time round, it was green (i.e. spinach). Additionally, I wanted the gravy to have a mildly tart and smoky taste, so lemon and fire-roasted peppers were my solution.

Lastly, the jamun itself: I did not want to just fry them. That would be too simple for an experiment.

So I stuffed them with cream cheese and raisins (my estimated guess was that they will complement the milky nature of the jamuns) before tossing them into the pan to sizzle and golden.

End result: Pretty good actually, and a dish that is bound to stun. My friends loved it, and I’m sure you will too!

thumb_IMG_1717_1024

Ingredients:

Gulab jamun kofta (makes 3):

  • Gulab jamun ready mix: 100 gms packet
  • Cream cheese: 1 wedge, divided into 3 equal portions
  • Golden raisins: 3
  • Oil: for shallow frying
  • Ghee: 1 tsp (optional)

Spinach and roasted piquillo pepper purée:

  • Spinach leaves: 1/2 bunch, cleaned
  • Red piquillo pepper: 2
  • Red onion: 1/2 medium, thinly sliced
  • Garlic: 1 small clove, crushed
  • Cinnamon: 1 small piece
  • Cardamom: 1 small pod
  • Clove: 3-4
  • Lemon juice: 1-1.5 tsp
  • Salt: To taste
  • Oil: 1.5-2 tbsp

Method:

Gulab jamun kofta:

  • Knead the gulab jamun mix with minimal water till it forms a soft pliable dough, with no cracks
  • Divide the dough into 3 equal portions and keep aside (covered, to prevent it from drying up)
  • Slightly flatten cream cheese onto your palm and place a raisin into it
  • Fold the cream cheese over the raisin into a ball
  • Lightly grease your hands with ghee/oil
  • Take a portion of dough and slightly flatten it onto your palms
  • Place the cream cheese/raisin ball into it and wrap the dough around the stuffing
  • Lightly roll the dough in your palms to ensure a smooth ball
  • Repeat above with remaining dough
  • Heat oil (sufficient for shallow frying) to medium temperature
  • Place jamun (one at a time) into the pan and shallow fry under medium-low flame till all sides are golden brown
  • Drain and keep aside

thumb_IMG_1700_1024

Spinach and roasted piquillo pepper purée:

  • First, blanch spinach leaves:
  1. Place spinach leaves in the boiling water, and allow them to boil for 30 seconds to 1 minute, until you see a bright green color
  2. Drain the excess water from spinach and put it into ice water bath for a few minutes, till it is no longer warm (this will stop the cooking process, keep the spinach tender, and retain the nutrients)
  3. Squeeze the spinach to remove excess water 
  4. Keep aside
  • Next, cook piquillo peppers on open flame till the surface completely chars:
  • Place peppers in a dish and cover with saran wrap, allowing the peppers to ‘sweat’ for 10 minutes
  • In the meanwhile, cook garlic and onions with 1/2 tbsp oil under low-medium flame till onion starts to caramelise (ensure that the garlic and onions do not burn). Switch off flame
  • After 10 minutes, remove the peppers and using the blunt side of the knife, gently scrape away the charred surface:

thumb_IMG_1859_1024.jpg

  • Chop off the pepper stems and remove inner seeds, if any
  • Blitz: Blanched spinach, piquillo peppers, garlic and onions (add little water, if required – the consistency should be puree-like)
  • Heat 1 tbsp oil and add cinnamon, cardamom pod and cloves
  • Cook under low flame till oil aromatises and add the puree
  • Cook under low-medium flame for 5-10 minutes, stirring occasionally to ensure it doesn’t burn
  • Add lemon juice and salt to taste
  • Switch off heat

To serve:

  • Plate purée onto a wide dish/bowl and place kofta on top of it
  • Serve hot with rice or roti’s
  • Note: The kofta’s are best eaten in its fresh and crisp form
  • Bon appetite! 🙂


Aubergine rollatini with spinach and cheddar

Rollatini is an Italian-style dish which usually comprises of thin aubergine slices covered with ricotta and often other types of cheeses and seasonings, which is rolled up and baked.

They are just so pretty and artistic with the outer skin delicately rolled over the filling to create a pinwheel design. It looks appetising and what’s best is that it is incredibly easy to make. I love making aubergine rollatini’s for Sunday brunches.

Traditionally I use a spinach and ricotta cheese combination for the filling. Unfortunately today I only had cheddar, so I used that instead. The only difference I felt was that the filling did not give the satin-creamy texture that you would get from ricotta.

However, the cheddar more than made up for this missing element by giving an amazing sharp taste, allowing the rollatini to have just the right amount of zing.

Aubergine rollatini with spinach and cheddar

Ingredients:

Aubergine rollatini:

  • Purple long aubergine – 6 slices; cut lengthwise, 1/4-inch thick
  • Spinach leaves – 150 gms, shredded
  • Cheddar cheese – 3/4 cup, freshly grated
  • Salt – to taste
  • Black pepper powder – to taste
  • Garlic – 2 cloves grated & 1 clove roughly chopped
  • Panco breadcrumbs – 2 tbsp

Chunky tomato sauce:

  • Butter – 1.5 tbsp
  • Garlic – 1.5 cloves, roughly chopped
  • Star anise – 2 shards
  • Dried fenugreek – 1 tsp
  • Black pepper powder – 1 tsp
  • Tomato paste – 1/2 cup

Method:

Aubergine rollatini:

  • Sprinkle salt onto the shredded spinach and keep aside; this will help extract water from the spinach
  • Sprinkle salt & black pepper powder on the aubergine slices and rub them onto the skin
  • Equally distribute 1/2 garlic clove amongst the slices and lightly rub it onto them for a mild garlic aroma to be infused
  • Keep aside for 15 minutes
  • Meanwhile drain excess water extracted from the spinach and mix in 1/2 cup cheddar cheese and remaining grated garlic
  • Season with black pepper powder as desired
  • Mix well and keep aside
  • Lightly grease a skillet and heat it on medium flame
  • Place aubergine slices onto the skillet and flip over once the base is slightly browned
  • Remove once both sides are toasty-brown and semi-cooked
  • Equally distribute the spinach filling amongst the aubergines
  • Spread the filling neatly across the slices
  • Gently roll the aubergine to desired thickness
  • Heat a skillet with butter and roughly chopped garlic
  • Once the butter starts bubbling, carefully arrange the rolled aubergines into the skillet
  • Top the rollatini’s with leftover cheddar cheese and breadcrumbs to give an added crunch
  • Cover the skillet with a lid and allow aubergines to fully cook under low flame for 5-7 minutes

Chunky tomato sauce:

  • Heat another skillet and add butter, garlic and star anise
  • Once the butter starts bubbling, add tomato paste and mix well
  • Cook on low flame for 5 minutes and add 1/4 cup water (optional)
  • Mix well and season sauce with dried fenugreek leaves and black pepper powder
  • Simmer for another minute or two for the sauce to thicken to desired consistency
  • Remove the star anise segments before serving

To assemble:

  • Spread a generous helping (~2 tsp) of sauce onto the plate per rollatini
  • Gently place rollatini’s on top of the sauce
  • Serve hot

Stir-fried ivy gourd

Simple and tasty, goes best with piping hot ghee-rice or freshly baked rotis.

Oh, and super easy to make plus really quick to whip up.

Stir-fried ivy gourd

Ingredients:

  • Ivy gourd – 250 gms, thinly sliced
  • Oil – 1.5 tbsp
  • Mustard seeds – 1/4 tsp
  • Asafoetida – 1 tsp
  • Turmeric powder – 1/2 tsp
  • Chilli powder – 1 tsp
  • Salt – to taste

Method:

  • Add 1/2 tbsp of oil to uncooked ivy gourds and microwave it on medium-high for 10 minutes, till the veggies are cooked whilst crunchy
  • Heat 1 tbsp oil on a pan and add mustard seeds and asafoetida
  • Once the seeds start crackling, add turmeric and chilli powders. Mix
  • Add ivy gourds and stir-fry on medium flame for the spices to coat the veggies well
  • Sprinkle salt and saute for an additional minute or two, till the ivy gourds mildly brown in colour
  • Switch off the flame and cover the pan for 5 minutes, for the flavours to get locked
  • Serve hot