Turmeric & ginger panna cotta

Happy 2017 guys! This is a super late post but I have been under such a food coma since Christmas that I had to time myself out to get life back on track! Christmas and New Years this time was really good on a gastronomical front. I finally got to try out a handful of highly raved about restaurants in Mumbai to test for myself if it was as good as everyone around me claimed (it was). I was seriously mind blown with the flavour combinations and fusions that the city offered.

In my short visit, I indulged in puff pastry loaded with mushrooms and cheese, sinfully guilted on possibly the best cheesecakes ever, smoked my ears out with charred cheese stuffed chili’s, was pleasantly surprised with the Indian take on a classic sushi, learnt that lemongrass makes for a really refreshing mousse and relished on a ton of desserts with unbelievable flavour twists.

And then of course there was a lot of home cooking and experimenting as well. So in a nutshell, I was overdosed on food when I came back to SG!

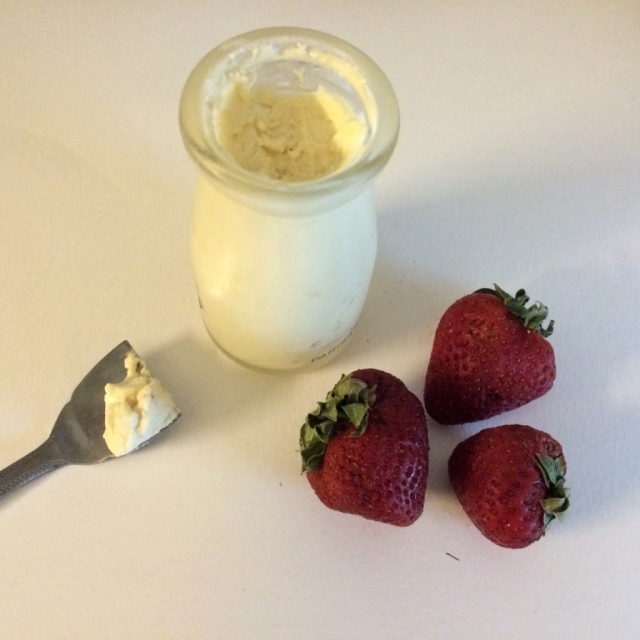
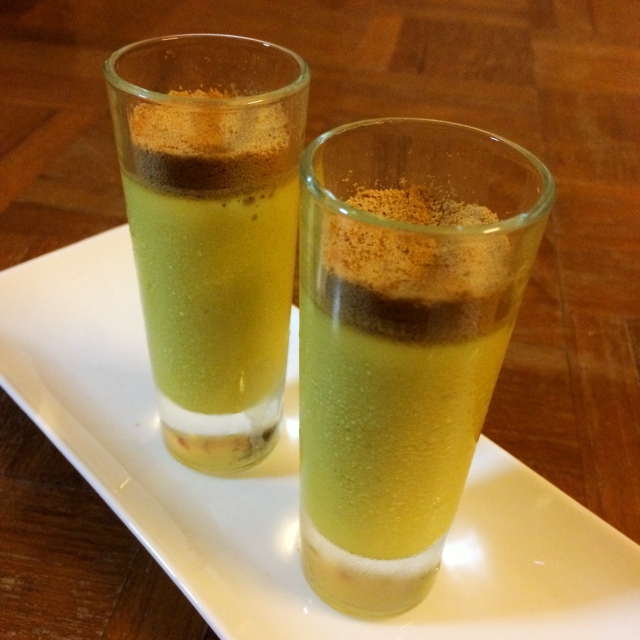
After one weeks rest, here I am, back to cooking and blogging. For the longest of time, I have wanted to use turmeric and ginger in a dessert format. Turmeric milk is a very common home remedy in India for cold and flu. Back home, we add crushed pepper, honey and raisins as well to help soothe an irate throat. The combination of these ingredients makes for a really yummy milk and is very therapeutic. It needs to be consumed piping hot when you are ill, but I really wanted to know how it would be in a chilled, custard-like form. So using similar same measurements used for the milk, I made panna cotta.

Now, I was expecting the panna cotta to be good, but trust you me, it is so much better than good! It’s cool, refreshing and plain yummy. If you have ever had turmeric milk (aka haldi ka doodh) during your childhood days this dessert is bound to make you nostalgic.

img_1707

Ingredients:

  • Heavy cream: 300 ml
  • Turmeric powder: 1 tsp (heaped)
  • Ginger: 1 tbsp, finely grated
  • Honey: 1/4 cup (or less, depending on your sweetness preference)
  • Black pepper: 1/2 tsp, freshly crushed
  • Gelatin: 2 tsp
  • Cold water: 2 tbsp

Method:

  • Mix all ingredients except gelatin and cold water in a pot and bring it to a steady simmer
  • Keep stirring occasionally and allow the cream to simmer for 5 minutes
  • Switch off the flame and allow the flavours to steep into the cream for another 5-7 minutes
  • In the meanwhile, bloom the gelatin in cold water
  • Add gelatin to the cream mixture and mix well so that it dissolves. The cream needs to be lukewarm when adding the gelatin – if it has become cold then switch the flame back on and heat till the mixture just starts simmering.
  • Sieve the cream through a fine mesh and pour into individual ramekins / shot glasses
  • Refrigerate overnight and serve once set

Caramel coconut whipped cream

Last week was my flatmate’s birthday, giving me the perfect opportunity to bake a cake. I was planning to make a chocolate sponge cake layered with cream and seasonal strawberries. But then I remembered that she detests cream (and any milk product for that matter). A couple of days back, I had made kuih kodok and had experimented with a caramel coconut cream which had turned out really well, with this insanely good tropical feel. Taking that as inspiration, I made caramel coconut whipped cream. At first I was apprehensive of the result, since I’d never whipped coconut cream before. But all my doubts were put to rest as I proceeded with my experiment.

The end result: Silky, luscious cream whipped to perfect hard peaks.

This complemented extremely well with the chocolate cake, but personally, I enjoyed finishing the leftover cream by dipping strawberries into them. Sheer bliss!

Next time, I want to try making a salted caramel version, but for now, here is the recipe for  my fail-proof, super delicious coconut whipped cream 🙂

thumb_IMG_0762_1024.jpg

Ingredients:

  • Sugar: 1/4 cup
  • Water: 1 tbsp
  • Thickened coconut cream: 1 cup
  • Pure vanilla extract: 2 tsp

Method:

  • Heat sugar and water in a pan till it caramelises and turns golden brown
  • Meanwhile, heat the coconut cream separately under low flame till it reaches its boiling point
  • Once the sugar caramelises, pour the coconut cream into it and stir continuously to ensure that the sauce is smooth without any lumps
  • Add vanilla extract and mix well
  • Pour the cream into a bowl and cover with saran wrap
  • Cool in the refrigerator for 4 hours or until completely chilled
  • Whip the chilled cream to hard peaks and serve with fresh fruits or use as frosting or eat it as it is!

Sun-dried tomato pesto

This recipe is killer good. The added component in the form of sun-dried tomatoes gives the pesto an extra something, and adding just the right amount of basil ensures that we  respect the good old origins of this condiment.

I have used this pesto recipe for a lot of dishes, ranging from using it as a marinade to converting it into a pasta sauce to slathering it generously on my pizza base.

Super versatile and really easy, this recipe is a must have.

thumb_IMG_0761_1024.jpg

Ingredients:

  • Sun-dried tomatoes: 1/2 cup
  • Sweet basil leaves: 1/2 cup
  • Pistachio: 1/8 cup, toasted
  • Parmesan cheese: 1/4 cup, freshly grated
  • Garlic: 2 medium-sized cloves
  • Salt: To taste (add after checking the saltiness of the sun-dried tomatoes)
  • Black pepper powder: 1/4 tsp, freshly ground
  • Extra virgin olive oil: 1/3 cup

Method:

  • Blitz: All ingredients except olive oil into a smooth paste
  • Add half the amount of olive oil and blitz again
  • Mix the paste, add in the remaining olive oil and blitz one last time
  • Taste the pesto and add salt/pepper as needed
  • Store the pesto in an airtight container; it will last for up to a week when kept refrigerated

Note: I like to keep my pesto in concentrated, semi-solid form, versus a more fluid one. If you prefer the latter, just add a tablespoon or two more of olive oil and give it a stir

Kuih kodok (Malaysian fried banana fritters)

Some time ago, my colleague had gotten homemade kuih kodok (i.e. Malaysian fried banana fritters) to work. They tasted so good; light, moist and rich in banana flavour. I loved the fritters so much that I had mentally tucked this dish aside to make at some point.

Today was a cold and rainy day; adding to my misery only because I was feeling under the weather. Regardless, here is the thing: when it rains, I have to have something fried, fresh and piping hot straight out of the frying pan. And this has to be accompanied with ginger tea.

Back home, I always bug my mum to make onion fritters (pakoras) with mint and tamarind chutneys while our housekeeper brews a fresh pot of strong ginger tea. We then munch away on the pakoras and idly chill while the rain pitter-patters.

Home away from home here, I can never bring myself to make onion fritters, because it feels like something that is special only with my mum. So instead I make other fried goodies, like today, where I decided to make the Kuih kodok.

These fritters puff up the minute it hits the oil and turn a beautiful hue of golden brown. When eaten hot, they are ever so soft, with a thin wafery crisp skin outside and pillowy soft inside, that is laden with the banana mix. So good.

I complemented the fritters with a caramel coconut sauce because I wanted something extra sweet. Coconut pairs with banana really well, but if you don’t like coconut, you can eat the fritters on its own. Or, if you don’t have a very sweet tooth, you can just serve a dollop of coconut cream with the fritters to cut the sweetness.

Any which way, these banana fritters are killer good and not too complicated to make, so you should definitely try your hand at it!

img_0623

Ingredients:

Kuih kodok:

  • Ripe bananas: 2, medium sized, roughly mashed
  • Plain flour: 1 cup
  • Sugar: 1 tbsp or as need, based on the sweetness of bananas
  • Salt: A pinch
  • Baking soda: 2 tsp
  • Water: 1/2 cup
  • Oil: To fry fritters

Caramel coconut dipping sauce:

  • Sugar: 1/4 cup
  • Water: 1 tbsp
  • Coconut cream: 1 cup

Method:

Kuih kodok:

  • Mix all dry ingredients in a bowl and add water
  • Mix well to combine and add mashed bananas
  • Stir gently to combine. The batter should be thick with a dropping consistency
  • Cover the bowl and allow the batter to rest for an hour
  • Heat oil and drop spoonfuls of batter into the frying pan
  • Remove fritters once they turn golden brown and puff up onto an absorbing paper
  • Serve immediately

Caramel coconut dipping sauce:

  • Heat sugar and water in a pan till it caramelises and turns golden brown
  • Meanwhile, heat the coconut cream separately under low flame till it reaches its boiling point
  • Once the sugar caramelises, pour the coconut cream into it and stir continuously to ensure that the sauce is smooth without any lumps
  • Cool and serve with the fritters (or refrigerate in an airtight container)


Homemade honeycomb

When I was a kid there were a select few chocolate treats that I would indulge in: Cadbury gems (specifically the pink and orange candy coated ones – my dad would sieve these ones out just for me), Cadbury fruit and nut (because that was/is my mums favourite and I automatically liked whatever she did) and Cadbury Crunch, because the combination of crunchy golden honeycomb with chocolate was way too irresistible.

Truth be told, I still love Cadbury Crunch and usually stock up on these for “emergency” needs. But you know how your stocked up goodies is never at our disposal when you really need it? This is exactly what happened over the weekend. I was super craving it but alas there were none for me to feast on!

Stubborn as I am, I thought okay lets see if it can be home made. And to my absolute surprise I learnt that it is really easy to make! The down side was that all recipes called for a lot of golden syrup – which is a) really not healthy and b) not an ingredient I keep.

So I figured, why not replace golden syrup with honey? It is after all, “honey”comb.

And as they say the rest is history. I came up with my own concoction and minutes later I was proudly staring at delicious, light, crunchy honeycomb made by moi.

And now, I am so excited to share it on my blog so that you can have a go at making it too !

img_0531

Ingredients:

  • Pure honey: 1/4 cup
  • Sugar: 3/4 cup
  • Baking soda: 1/2 tbsp

Method:

  • Keep a silpat mat or a tray lined with parchment paper ready
  • Sift baking soda into a small bowl and keep aside
  • In a deep pot, add sugar and honey, and give it a good mix with a spatula to ensure homogeneity
  • Heat the sugar-honey mixture under medium flame, stirring occasisonally
  • Switch off the flame once the sugar completely dissolves and the mixture starts caramelising (this is indicated by the change in color to a darker brown)
  • Quickly dump the baking soda and stir continuously, till the powder dissolves well. Be careful at this step as the mixture will bubble up (which is why you need a deep pot)
  • Immediately pour the mixture onto a silpat mat or a tray lined with parchment paper and allow it to cool (or stick it in the fridge to cool, if your surrounding is too hot/humid)
  • Once cooled, break the honeycomb into bite-sized pieces and enjoy!
  • Store the leftovers in an airtight container

Kothu roti

My (Sri Lankan) friend’s mum is a really good cook. I love the way she makes tomato rice, string hoppers (the best ever) and Sri Lankan-style potatoes and dry coconut chutney.

But, one dish of hers that fascinates me the most is the “kothu roti.”

Kothu roti is a popular spicy Sri Lankan street food, which is a stir-fry of shredded roti (Indian flatbread), vegetables (and/or meat and egg), and coconut-based spice mix.

I had been wanting to try this dish out myself for the longest of time.

Yesterday for lunch, I finally did. My friend always says that it is the quickest thing to whip up – and I got to test this claim for myself.

She was right! This dish only took me 15 minutes to make (I had roti’s ready on hand), and another 5-7 minutes to devour it up entirely.

When it comes to flavors – you will be floored by the warm comforting tastes from the coconut spice – the combination of coconut and curry leaves make everything so warm and earthy. And the chopped tomatoes provides just the perfect balance of tanginess that is needed to complement the sweetness from the coconut. Once this spice paste combines with the roti’s, it is an absolute medley of flavors.

Because I took the quick, cheats way out, I didn’t bother putting in any vegetables. But you can add shredded vegetables. If you eat eggs, be sure to add them too – scrambling eggs into kothu roti is very popular.

One last thing before moving on to the recipe – the pic below isn’t my proudest capture. I was obviously too excited and plated it up while it was still piping hot, resulting in a fogged, somewhat mushy looking thing. BUUUUUUUUT it’s really good in taste. So ignore the way my miserable image looks and hop right over to this incredible recipe!

IMG_9812.JPG

Ingredients:

  • Roti: 3-4, shredded
  • Onion: 1/2, finely chopped
  • Tomato: 1 medium, finely chopped
  • Coconut milk: 1/2 cup
  • Garlic clove: 1, minced
  • Curry leaves: 6-7
  • Dry red chili: 2
  • Mustard seeds: 1 tsp
  • Turmeric: 1 tsp
  • Red chili powder: 1 tsp (or more, based on your spice preference)
  • Coriander powder: 2 tsp
  • Oil: 1 tbsp
  • Salt: To taste

Method:

  • Heat oil in a pan and add dried red chilies, mustard seeds and curry leaves
  • Once the mustard seeds start spluttering, add turmeric, red chili powder, coriander powder and salt
  • Stir well and add chopped onions and garlic
  • Saute the mix under medium flame for 2-3 minutes,or till the onions soften
  • Next, add in the tomatoes and give a good stir
  • Cook the mix till the tomatoes become tender, and the mixture starts assembling into a unified paste
  • Lastly, add in the coconut milk and stir well
  • Cook till the solution slightly thickens and switch off the flame
  • Remove the spice into a separate bowl
  • Place the pan back onto the stove, and under medium flame, toss in the shredded roti’s
  • Give a quick stir and once the roti’s are evenly heated (they should start to crisp up at this point), add in the coconut spice mix
  • Stir quickly, ensuring the roti’s are well coated with the spices.
  • Switch off flame and serve hot

Pineapple pachadi

A delectable and tropical dish at its savoury finest, pineapple pachadi is a South Indian side dish (quite popular in Kerala), which is made of cooked and tempered fresh pineapple and yoghurt. Sweet and tangy in taste, this recipe is absolutely fail-proof and a crowd pleaser.

What makes this dish really stand out is the way all the ingredients work so well with each other, creating a flavourful punch with every spoonful.

If you are still dubious about pineapple not being in a dessert format, here are the plus points that will (hopefully) convince you into making this dish:

  1. Unique: How many times would you hear a tropical fruit being made savoury? So cool!
  2. Easy peasy: This dish takes 15 minutes tops. You can actually make it while streaming videos on YouTube (I know I did!)
  3. Healthy: Fresh fruits are any day overly nutritious and this dish guarantees a close to nil grease. Fitness watch: Check
  4. Addictively delicious: Isn’t it always amazing when healthy food is finger licking’ good?

So the next time you buy pineapples to bake an upside down cake or blend a pina colada, do save some pineapple pieces to try your hand at this outstanding dish – you will love it!

IMG_9480.JPG

Ingredients:

  • Fresh honey pineapple: 1 cup, cored and chopped into small pieces
  • Fresh coconut: 1/4 cup
  • Cumin seeds: 1 tsp
  • Black mustard seeds: 2 tsp
  • Turmeric powder: 1/4 tsp
  • Red chilli powder: 1 tsp
  • Dried red chilli – 1
  • Curry leaves: 1 sprig
  • Oil: 1 tbsp
  • Sugar: 1 tbsp
  • Salt: To taste
  • Fresh yoghurt: 1/4 cup, beaten till smooth

Method:

  • Blitz: Coconut, cumin seeds and 1 tsp black mustard seeds to a fine mixture
  • In a pan, add pineapple, turmeric powder, chilli powder, sugar and salt
  • Mix well and add 3-4 tbsp water. Let the pineapple cook and become tender, stirring frequently
  • Once pineapple gets cooked, add the coconut mixture and cook till the pungent/raw smell dissipates
  • Once the water evaporates and the mixture becomes semi-dry, switch off flame and add in the yoghurt. Mix well and pour into a serving bowl
  • In a separate small pan, heat 1 tbsp oil and add remaining mustard seeds, dry red chilli and curry leaves
  • Once the temper starts to splutter, switch off flame and pour it onto the pineapple mixture
  • Serve immediately (preferably with hot rice but also as a dip)
  • Enjoy!

Zucchini tontona

I have a pet peeve for food wastage, especially knowing that there are so many in this world who are not fortunate enough to have even one proper meal in a day. The other day I was grilling some marinated zucchinis, with the skin peeled off. I was about to chuck the peels in the waste bin when I remembered that my grandmother used to make a simple dish out of vegetable peels. She used to call it “tontona” – basically a combination of yoghurt and vegetable peel. More often than not my granny would use ridged gourd peels for this. With zucchini peel in hand, I figured why not try it with this instead.

Excitedly I whatsapped my mum to share the recipe with me and 15 minutes later (yes, it is really fast to make), I was facing a nutritious, delicious comfort food that I knew will go really well with my freshly prepared steamed rice and ghee.

This recipe is really special to me, because I grew up eating it. No doubt, the nostalgic waves just enhanced this humble dish into an extraordinary one for me.

The next time you are about to chuck vegetable peels in the bin, do consider this recipe – it is absolutely worth it.

IMG_9190.JPG

Ingredients:

  • Zucchini peel: x1
  • Yoghurt: 1/2 cup
  • Green chilli: x1, slit (add more if you want to more punch)
  • Black peppercorns: 3-4
  • Cumin seeds: 1/4 tsp
  • Fresh coconut: 1/4 cup, grated
  • Asafoetida: 1/4 tsp
  • Mustard seed: 1/4 tsp
  • Chana dal (split Bengal gram): 1/4 tsp (optional)
  • Oil: 1-2 tbsp
  • Salt: To taste

Method:

  • Microwave zucchini peel, green chilli peppercorns and cumin seeds, with minimal water for about a minute or till the peel is soft
  • Grind this with fresh coconut, asafoetida and salt. Keep aside
  • In a pan, prepare the tempering: Heat oil  and add mustard seeds and split Bengal gram
  • Once they start spluttering, pour the tempering into the ground mixture and allow it to cool
  • Lastly, mix in the yoghurt: start with quarter cup yoghurt, mix and taste. If you want the dish to be more diluted, add in the remaining yoghurt.
  • Adjust seasoning as needed and serve with hot rice


One Lovely Blog Award

one-lovely-blogx2


So The Veggie Cooker got nominated for TWO One Lovely Blog Awards; yaay! As stoked as I am, since the rules for both are the same, I am combining the two into one blog entry 😀

But first many thanks to bloggers Anuradha of Aromas of my Kitchen and Utkarshini of Binding Curry for the nominations!

If you haven’t visited their blog before, you are missing out on so much; both authors are food bloggers who post amazing recipes that is bound to compel you to go to your kitchen. Examples in point: the Bengali-cious Dhokaar Dalna from Aromas of my Kitchen and  Korn Kambhakht from Binding Curry. Do they look delicious or do they look delicious? Seriously, go check their bogs.

Now the rules:

  1. Post to accept the nomination.
  2. Thank the person who nominated you and link to their blog.
  3. List 7 things about yourself.
  4. Link to the blogs you nominate.
  5. Notify the recipients of their award.
  6. Post the rules!

Here goes 7 things about myself:

  1. Most of my life’s core principles are based on Bollywood movies. Be it Crime Master Gogo aka Shakti Kapoor from Andaz Apna Apna (Aaya hoon toh kuch toh leke jaaunga) or Rahul Khanna aka Shahrukh Khan from Kuch Kuch Hota Hai (Hum ek baar jite hain, ek baar marte hain, shaadi bhi ek hi baar hoti hai, aur pyaar…pyaar bhi ek hi baar hota hai)
  2. Actually I am inspired by all things Shahrukh – From the way he built his life from scratch, to the way he gives major relationship goals courtesy his flawless relationship with Gauri Khan, to his intense & impactful dialogues across his library of movies (Kehte hain agar kisi cheez ko dil se chaho to puri kainaat usse tumse milane ki koshish mein lag jaati hai from Om Shanti Om / Main aaj bhi usse utni hi mohabbat karta hoon aur is liye nahi ki koi aur nahi mili … par is liye ki usse mohabbat karne se fursat hi nahi milti from Mohabatein / Vaar karna hai toh samne waale ke goal par nahi, samnewaale ke dimag par karo … goal khud-ba-khud ho jayega from Chak de India, to name few). At first these dialogues may appear fluff, but at the core of it most of them are actually quite true when you sit down to think about it.
  3. I am so inspired by the key takeaway message from the recently released movie, Baar Baar Dekho that right now if I was granted one wish, it would be to have a time machine – to go back in time and relive moments which will never come back
  4. When I am not cooking or watching movies and daydreaming about picture perfect fairy tale lives, I am found in the corner of my room, buried in a book
  5. I love purple and black – so much so that pretty much everything I own is either of the colours
  6. I find making desserts the most difficult, because adding the right amount of sweetness is always tricky
  7. I love cheese of all kinds. Except maybe for the Stilton ones

Blogs I want to nominate:

This is always so hard, because all blogs are so good! But to name a few off the top of my mind which have recently caught my attention:

  1. Savvy South Indian … for showing how simple meals can be jazzed and made special
  2. Heenie Blogs Food … for the ability in providing recipes in easy to follow instructions, regardless of the complexity of the dish
  3. Keralas Live … for the creative genius that complements every dish to perfection
  4. Super Duper Yumm Cooking … for the everlasting patience in ensuring that all recipes not only showcase a beautifully captured end-result, but equally well captured work-in-progress photos to help the reader understand the recipes better
  5. Masala Vegan … for posting plant based recipes, in vegan form. If you think being vegetarian is hard, try being a vegan and also holding a plethora of delicious vegan recipes to your name
  6. Mackmarie … for articulating the joys of life and recording her adventures in a captivating way
  7. Cook with Smile Blog … for all those yummy home-style recipes that makes my mouth water every time I visit the blog

Thanks again and happy blogging! xx

Liebster award

liebster-award

Many thanks to Dr Jyothi of The friendly epicurean for nominating me for the Liebster award. It’s always nice to get nominations from from bloggers who have an incredibly good blog running; do go check out Jyothi’s blog when you have time to spare; her plant based recipes from around the world are definitely for keeps.

The Rules:

1. Write a post to show your award
2. Acknowledge the blogger who nominated you
3. Give a brief story of why you started blogging
4. Give advice to your fellow bloggers
5. Nominate a few bloggers for the award
6. Leave a comment to let the nominated bloggers know about the award

The passion for cooking runs in my bloodline. Having said that, when I shifted to Singapore to start building my career, a lot of my spare time was spent in the kitchen, learning the nuances of cooking. It became a habit to take a snap of every thing I made (the good, the bad and occasionally the ugly). As time passed, there were so many recipes I had tried out which were unrecorded – becoming a challenge when I wanted to repeat the dish or share it with others to try. This spurred me to start blogging; to save my recipes as well as share them with those who requested for it.

My advice to new bloggers is to enjoy the time spent in uploading new posts; by the end of the day, you need to be satisfied with what you share out to the rest of the world!

I nominate the below bloggers for their fantastic and diverse blogs:

  1. Swetha’s Culinary Trails
  2. Cradle of Joy
  3. Dream Temples
  4. Ministry of Curry
  5. Forgiving Connects

Happy blogging! xx